Collecting data from plants and indoor air treatment devices
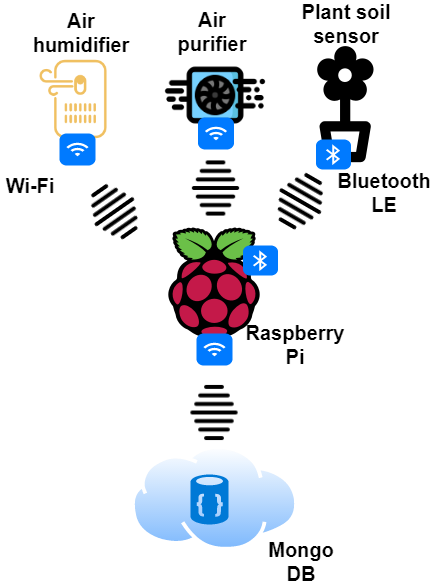 Architecture
In this article, I would like to share my experience in how to collect sensor data from different devices in my home and store this data for future analysis in a Mongo Database. The picture below shows the current architecture.
The main components are a Raspberry Pi Zero for data collection and connecting between different systems. Included in my setup are a plant soil sensor with Bluetooth LE, an air purifier with Wi-Fi, an air humidifier with Wi-Fi, and a Mongo database in the cloud.
The main Python libraries used are ‘Python-miio’ for the air humidifier and air purifier, and ‘Miflora’ for the plant soil sensor.
Xiaomi Air Humidifier sensor data collection
The air humidifier ‘Xiaomi Smartmi Humidifier’ offers sensor data such as: humidity, motor speed and temperature. In addition, it provides device data such as: power-on status and use time.
All of this data gets collected and stored in a remote Mongo DB.
Extract of ‘xiaoMi_AirHumidifier.py’
from miio import AirHumidifierCA1

#Connect to AirPurifier
xmAH=  AirHumidifierCA1("<IP>", "<Token>")

#Get data
status = xmAH.status()
humidity=status.humidity
.
.
.
Example of collected sensor data
{
    "_id" : "2020-XX-XX 10:54:42.064516",
    "power" : "on",
    "mode" : "OperationMode.High",
    "temperature" : 23.3,
    "humidity" : 66,
    "motor_speed" : 996,
    "use_time" : 5798924
}
################################################################
Xiaomi Air Purifier sensor data collection
The air purifier ‘Mi Air Purifier 2S’ from Xiaomi offers sensor data such as: AQI, humidity, light intensity, motor speed and temperature. In addition, it provides device data such as: power-on status, filter hours used, filter hours remaining and operation mode.
All of this data gets collected and stored in a remote Mongo DB.
Extract of ‘xiaoMi_AirPurifier.py’
from miio import AirPurifier, DeviceException

#Connect to AirPurifier
xm_airP=  AirPurifier("<IP>", "<Token>")

#Get data
status = xm_airP.status()
api=status.aqi
.
.
.
Example of collected sensor data
{
    "_id" : "2020-xx-xx 10:54:36.396005",
    "aqi" : 1,
    "humidity" : 60,
    "illuminance" : 22,
    "os_on" : "True",
    "motor_speed" : 845,
    "temp" : 24.3,
    "filter_hours_used" : 209,
    "filter_life_remaining" : 94,
    "average_aqi" : 3,
    "mode" : "OperationMode.Favorite"
}
################################################################
Flower care sensor data collection
The plant soil sensor ‘Flower Care Smart Monitor’ offers sensor data such as: temperature, moisture, light intensity and conductivity. In addition, it provides device data such as: firmware version, name and battery level.
All of this data gets collected and stored in a remote Mongo DB.
Extract of ‘flowerCareCollector.py’
from btlewrap import available_backends, BluepyBackend, \
	GatttoolBackend, PygattBackend
from miflora.miflora_poller import MiFloraPoller, \
    MI_CONDUCTIVITY, MI_MOISTURE, MI_LIGHT, MI_TEMPERATURE, MI_BATTERY


mac='C4:7C:XX:XX:XX:XX' #<--- Get MAC-Address via 'sudo hcitool lescan'
poller = MiFloraPoller(mac, GatttoolBackend)

#Get historic sensor data
history_list = poller.fetch_history()

#Get current sensor data
temp=poller.parameter_value(MI_TEMPERATURE)
moisture=poller.parameter_value(MI_MOISTURE)
light=poller.parameter_value(MI_MOISTURE)
conductivity=poller.parameter_value(MI_CONDUCTIVITY)
.
.
.
Example of collected sensor data
{
    "_id" : ISODate("2020-XX-XXT09:09:49.712Z"),
    "temperature" : 26.7,
    "moisture" : 64,
    "light" : 2149,
    "conductivity" : 2213
}
################################################################
Setting up Raspberry Pi Zero
The easiest way to install the ‘Raspberry Pi OS’ is to download the ‘Raspberry Pi OS (32-bit) Lite’ version and flash it via ‘ETCHER’. Detailed instruction can be found ‘here’.
Setting up the Raspberry Pi witout a monitor
- After flashing with Etcher, add a file in the folder ‘/boot’ with the name ‘ssh’ to activate SSH server during bootup.
- Create the file ‘wpa_supplicant.conf’ (see below) under ‘/boot’.
- Connect to the Pi via ‘ssh pi@raspberrypi.local’ from your terminal. Use ‘raspberrypi-NUM.local’ if you have more than one Pi.
#wpa_supplicant.conf

country=US
ctrl_interface=DIR=/var/run/wpa_supplicant GROUP=netdev
update_config=1

network={
ssid="Wi-Fi_SSID"
scan_ssid=1
psk="Wi-Fi_PASSWORD"
key_mgmt=WPA-PSK
}
How to secure your Raspberry Pi
Changing the default password
passwd
Setting up a firewall (be careful, you can lock yourself out)
sudo apt install ufw
Allow SSH
sudo ufw allow ssh
sudo ufw allow 22
Enable firewall
sudo ufw enable
Further hardening such as: add new user with different (not-default) name and delete user pi, use SSH Key-based authentication, use Fail2Ban, make sudo require a password and how to update your packages regularly can be found on various websites.
Setting up the Pi enviroment
sudo apt-get update && sudo apt-get upgrade -y
Install Python 3
sudo apt install python-pip python3-pip -y
wget https://bootstrap.pypa.io/get-pip.py sudo pip3 install pip
Install Xiao Mi Python Libary
See documentation for further information
pip install python-miio
Install Plant Care Python Libary
git clone https://github.com/open-homeautomation/miflora.git
Install libaries with pip as needed
Set up cron jobs to start sensor data collection automatically after reboot
Example of cron launcher file ‘xiaomiairhumidifier_launcher.sh’
#!/bin/sh

cd /
cd home/pi/xiaomi
python3 xiaoMi_AirHumidifier.py
cd /
chmod 755 xiaomiairhumidifier_launcher.sh
Add a launcher file to a cron job
sudo crontab -e

@reboot sh /home/pi/xiaomi/xiaomiairhumidifier_launcher.sh >/home/pi/logs/cronlog 2>&1
Install telegraf for Pi device monitoring
sudo apt install -y gnupg2 curl wget
wget -qO- https://repos.influxdata.com/influxdb.key | sudo apt-key add -
echo "deb https://repos.influxdata.com/debian buster stable" | sudo tee /etc/apt/sources.list.d/influxdb.list
sudo apt update
sudo apt -y install telegraf
Test if telegraf is running
systemctl status telegraf
Configure InfluxDB in ‘telegraf.conf’ to store device metrics and restart telegraf afterwards``
nano /etc/telegraf/telegraf.conf
###############################################################################
#                            OUTPUT PLUGINS                                   #
###############################################################################


# Configuration for sending metrics to InfluxDB
[[outputs.influxdb]]
  ## The full HTTP or UDP URL for your InfluxDB instance.
  ##
  ## Multiple URLs can be specified for a single cluster, only ONE of the
  ## urls will be written to each interval.
  # urls = ["unix:///var/run/influxdb.sock"]
  # urls = ["udp://127.0.0.1:8089"]#<---------------------------- Edit this